


Home Adaptations & Accessible Living with Chronic Illness
When you live with chronic illness, sometimes the tiniest changes to your home setup can make an enormous difference to how you feel and what you're able to manage throughout the day. When you're living with several conditions that affect different parts of your body, it can become a bit of a puzzle figuring out how to make things more accessible!
For me, having Hypermobile Ehlers-Danlos Syndrome (hEDS) means my joints can partially dislocate doing the most ordinary things, like bending down, lifting something, getting up from a chair or simply sitting in an uncomfortable position.
Then there's my cervical instability and vestibular migraine, which can make leaning forwards or having my neck unsupported particularly problematic, alongside PoTS, fatigue and MCAS, which all come with their own considerations.
So over the past eight years I've gradually adapted practically every aspect of my home environment to make daily life a little more manageable.
From creating different supportive sofa setups and finding useful gadgets, to completely changing how I organise my kitchen, clean the house and work from home.
After moving homes several times since being diagnosed, I've learnt SO much about what makes a property accessible for my particular needs.
In 2026 we finally moved into an accessible bungalow, and honestly, it's been such a gamechanger!
I wanted to share all the little adaptations I've made over the years, including what helped in our previous homes, what I've changed more recently and the things I've learnt from moving house with multiple chronic illnesses.
Obviously everyone's conditions, mobility and requirements will be different, so what works for me might not be suitable for somebody else. But hopefully there's something here that gives you an idea for adapting your own space, even if it's just moving a few things around rather than making any major changes!
Scroll and read it all or tap the buttons below to jump to the relevant sections.
MOVING HOME WITH CHRONIC ILLNESS
Moving house can be stressful and physically exhausting at the best of times. But when you have complex chronic illnesses, disabilities or allergies, there's often an enormous amount of additional planning involved before you even get to moving day. We also had the experience of trying to sell our place for two whole years, with 4 properties across that time that fell through until we found the one in 2026. But that's a different story to tell.
Since being diagnosed, I've moved several times, and each experience has taught me more about how significantly the environment we live in can affect our symptoms and independence.
It's also made me realise that finding somewhere accessible isn't necessarily as simple as looking for a property without stairs.
There can be so many other things to consider, from the layout of the kitchen and bathroom to the flooring, ventilation, accessibility of the surrounding area and whether you can safely tolerate the materials used in the property.
And what's accessible for one disabled person might not be accessible for another.


THINK ABOUT WHAT MAKES A PROPERTY ACCESSIBLE FOR YOU
Before moving, I think it's incredibly useful to reflect on the things you find most challenging in your current home.
For me, one of the biggest considerations is avoiding unnecessary bending and lifting.
With my EDS and cervical instability, these movements can trigger joint subluxations, pain and migraine symptoms, so something as simple as the position of an oven or washing machine can make an enormous difference.
I'd recommend thinking about your daily routine and asking yourself:
-
Which movements regularly trigger symptoms?
-
Are there particular chores or activities you struggle with?
-
Do stairs make daily life more difficult?
-
Can you access the appliances and items you use most often?
-
Is there enough space for any mobility aids or medical equipment?
-
Are the floors and thresholds suitable for your needs?
-
Can you rest comfortably in the rooms where you spend most of your time?
-
Does the surrounding area suit your mobility and transport requirements?
-
Are there environmental triggers that might be difficult to manage?
And when looking at potential properties, try to picture yourself actually going through your daily routine.
Not just whether the home looks lovely, but how you'd manage making breakfast, doing laundry, getting to the bathroom, carrying things from room to room and getting outside.
These were all things that became increasingly important to me over the years.
PREPARING FOR MOVING DAY
When we moved in 2026, I was actually in my second trimester of pregnancy, alongside managing all my usual chronic illnesses.
Thankfully I'd been feeling considerably better than during my first trimester, when I'd spent most of the time on the sofa with severe nausea and fatigue.
But I still wanted to make the process as manageable as possible, particularly because of my joint instability and MCAS.
For the first time, we booked a removals company that offered a packing service as well as physically moving everything.
And honestly, this made SUCH a difference!
They came the day before to pack our belongings, then handled the move itself on completion day.
It meant I wasn't spending weeks physically lifting and carrying boxes, repeatedly bending down or trying to push my body beyond what it could manage.
I could concentrate on the things that needed my attention, whilst leaving the physically demanding parts to somebody else.
Obviously professional packing services aren't going to be affordable or necessary for everybody, but if lifting, bending or fatigue are major challenges for you, they're definitely worth considering if your budget allows.


PREPARING OUR BELONGINGS WITH MCAS AND ALLERGIES
Something that made our move particularly complicated was my MCAS. I have severe sensitivities to fragrances, laundry products and other environmental triggers, so moving house meant thinking about things that most people wouldn't need to consider.
For example, having other people packing and handling our clothes could potentially transfer fragrance or laundry detergent residues onto them. So before the removals team arrived, I gradually vacuum-packed our clothes and other sensitive belongings myself.
That way, the movers could handle the sealed bags without directly touching everything inside.
It was such a simple adaptation, but it removed a whole potential source of reactions, and rather than trying to do everything in one go, I started preparing what I could gradually before the move.
I think that's a really useful approach whenever you have chronic illness. There can be SO many jobs involved in moving, but spreading the manageable ones over a longer period can make the whole process less overwhelming.
MAKING THE NEW PROPERTY SUITABLE FOR MY ALLERGIES
One of our biggest priorities with the new home was making sure the environment would be suitable for my MCAS.
The previous owners had a dog, and because I'm allergic to animal fur and dander, we arranged for the carpets to be removed on the morning of completion. We then had a professional deep clean before moving our belongings in. For me, removing the carpets was particularly important because soft furnishings and carpets can hold onto allergens and residues that are difficult to completely remove.
We also wanted to make the space work for us, so we arranged additional changes to the flooring and decoration. Of course, that meant we ended up living through a few weeks of renovations!
We had the carpets replaced with hard flooring and had rooms painted, including using lower-emission paints and limewash products selected for our project, but even when you're trying to use products that are more suitable for your sensitivities, building work itself can introduce a whole range of potential triggers.
Dust, sanding, paint, workers' fragranced clothing and residues from materials can all become considerations. So we had to plan carefully around the environment whilst the work was happening.
LIVING THROUGH RENOVATIONS WITH MCAS
For around three weeks, our home was essentially a building site. We slept in the living room whilst the bedrooms were being worked on, and tried to keep the spaces separated as much as possible. We had three air purifiers running, asked the builders to keep doors closed and use barriers where practical to help limit the spread of dust.
It was springtime and still pretty chilly outside, but whenever the weather allowed, I spent a lot of the day sitting outdoors wrapped up in layers with hot water bottles. Not exactly glamorous, haha. But it was preferable to spending the entire day inside whilst filling and sanding were happening.
Despite all the precautions, I still experienced an increase in MCAS symptoms, including rashes, mouth hives and my asthma-type cough, and needed to discuss and adjust my medication management. So it certainly wasn't an easy few weeks. But once everything had settled and we finally had the home organised, the difference was enormous.
It's another reminder that sometimes adaptations involve a lot of preparation and temporary inconvenience, even when the long-term result is incredibly worthwhile. If you're renovating with chemical sensitivities, I'd recommend discussing specific products, ventilation, dust containment and suitable alternative accommodation with relevant professionals beforehand. Products labelled natural, low-toxin or low-VOC aren't automatically safe for everybody with MCAS.


MY ACCESSIBLE BUNGALOW:
WHY IT WORKS SO WELL FOR ME
After having our previous property on the market for two years, and several other properties falling through or not working out, we finally found a bungalow in 2026 that suited SO many of my accessibility needs.
And honestly, I can't tell you how much I love it!
Everything being on one level has made everyday life significantly easier.
No stairs to navigate between different areas of the house, no carrying things up and down between floors and much less need to think about how I'm going to manage moving from one room to another when my joints are particularly unstable.
But there are lots of other little details that have made a difference too.

LEVEL ACCESS THROUGHOUT THE HOME
With hEDS, even something like walking upstairs can become challenging because my hips and knees can partially dislocate, and having PoTS can bring additional difficulties with dizziness and changes in posture.
So living in a bungalow means that I can move between the rooms without having to navigate stairs.
It's also been particularly helpful since having our baby.
When you're already managing joint instability and fatigue, being able to move from the bedroom to the living room, kitchen or baby's room without going up and down stairs is such a lovely thing, and with a newborn, there are inevitably times when you're carrying things or trying to move around whilst exhausted.
Having that level access removes an entire set of obstacles from daily life.
HIGHER APPLIANCES IN THE KITCHEN
This has been one of my favourite features of the bungalow. We have a raised oven and microwave, which means I no longer have to bend right down to the floor to use them.
It sounds like such a small thing, but when bending forwards can trigger joint subluxations or vestibular migraine, it makes an enormous difference.
I've previously had to find ways around using lower appliances, including sitting on a low stool or pouffe rather than repeatedly bending down. So having appliances at a height that's much more accessible for me is honestly a gamechanger. It's something I'd absolutely prioritise again if we ever moved in the future.
That being said our washing machine and dryer are both down below, which I'll elaborate below on what I do.
A MORE MANAGEABLE LAYOUT
Something else I love is how easily everything flows from one space to another. When you spend a lot of time at home with chronic illness, the layout and distances between the rooms you use most often can have a surprisingly big impact on your day.
Being able to move around the house without unnecessarily difficult transitions makes everyday routines easier, and having the right spaces for rest, work and now looking after a baby means that we can adapt each area around how we actually use it.
We also have our home photography studio, which allows me to continue working flexibly without needing to travel to a workplace.
For me, an accessible home isn't just about being able to physically get into a room.
It's about how comfortably and sustainably you can actually live in that space.
KITCHEN ADAPTATIONS FOR CHRONIC ILLNESS
I think the kitchen is one of those places where we end up doing a surprising amount of bending, lifting, reaching, twisting and standing without necessarily noticing.
But if you have joint instability, chronic pain, fatigue, dizziness or other mobility-related symptoms, all those little movements can add up!
Over the years I've made a whole range of changes to how I use and organise the kitchen.
Some are bigger things, like having raised appliances, but lots are incredibly simple adaptations that don't require changing the kitchen itself.


MAKE HOUSEHOLD CHORES WORK AROUND YOUR BODY
Something I've gradually learnt is that there's no rule saying you have to complete a chore in the traditional way.
-
If bending down to put laundry away is difficult, perhaps hooks or more accessible storage would help. If carrying heavy laundry baskets causes problems, smaller loads or a wheeled basket might be more manageable.
-
If you struggle to lift heavy deliveries, ask whether parcels can be placed somewhere accessible rather than handed directly to you.
-
If certain chores take a lot out of you, it might make more sense to spread them across the week rather than trying to do everything in one day.
-
if you're sharing a home with somebody else, dividing jobs according to individual physical abilities can make a big difference. For example only doing the top shelf of the dishwasher.
I've learnt that being able to do something once doesn't necessarily mean it's worth triggering a flare-up to do it repeatedly. Sometimes finding another way of doing the task is the most sensible option.


PILLOWS, CUSHIONS AND POSITIONING FOR JOINT SUPPORT
If you've followed me for a while, you'll probably know that I'm a little bit obsessed with pillows and cushions!
When you have joint instability, chronic pain and neck or spinal issues, I genuinely think finding the right supportive setup can make such a difference to everyday comfort. Over the years I've collected all sorts of cushions for different purposes.
Some are specifically designed for certain areas of the body, and others are just ordinary pillows that I've found ways to use for additional support.
For me, it's largely about reducing the amount of effort my muscles have to put into holding me in a particular position and trying to avoid movements or postures that trigger symptoms.
Of course, what feels supportive for one person might be uncomfortable or unsuitable for somebody else, so it can take some trial and error.


BEANIE CUSHION FOR NECK, BACK AND ARM SUPPORT
One of the most versatile cushions I've found is a beanie-style cushion. Because the filling moves around, you can mould it into different shapes and use it in lots of different positions.
I use mine to support my neck when sitting on the sofa, particularly when the backrest isn't high enough to properly support my head.
But I can also move it around and use it as a lumbar support or armrest.
It's such a simple thing, but being able to adjust the support to exactly where I need it is incredibly useful.
BOLSTER UNDER THE KNEES
Because of my joint hypermobility, I can find it uncomfortable when my knees fall into hyperextension.
Using a bolster or supportive cushion underneath them can help me rest in a more comfortable position.
It's something I often incorporate into my sofa or recliner setups, alongside the other cushions I use.
The aim is to find a position that feels properly supported without forcing the joints into uncomfortable positions.
COCCYX CUSHION
This is probably one of the most important cushions in my collection. My coccyx has been unstable since it first partially dislocated in my twenties, and sitting on unsuitable surfaces can be incredibly uncomfortable.
So I use a coccyx cushion practically everywhere I need to sit; at home, in public places, when travelling and anywhere else that I might otherwise struggle with the pressure on my tailbone and pelvis.
It can also be useful for certain types of lower-back, pelvic or sciatic discomfort, although the right shape and firmness will vary depending on the cause of the pain.
I even pack mine when travelling because it's one of those things I really don't want to be without!
SPECIALIST SLEEPING PILLOW
Another thing that's made a huge difference for me is finding a sleeping pillow that properly supports my neck. With cervical instability, sleeping on an unsuitable pillow can leave me with significantly worse symptoms.
I've found a particular pillow that works for my needs, and I now take it with me whenever I travel. It might sound a bit excessive packing your own sleeping pillow for a holiday, but honestly, when you've experienced how much an unsuitable pillow can affect your neck, it becomes a pretty essential thing!
It's also one of the reasons I spend so much time researching accommodation and preparing before travelling.
PILLOW BETWEEN OR UNDER THE LEGS
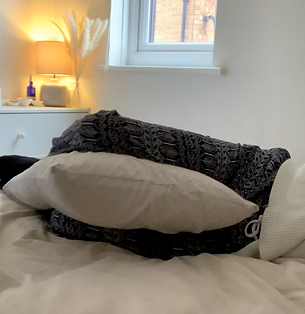
I also use an additional pillow when sleeping to help support my hips, pelvis and lower back.
When I'm lying on my side, I can place it between my legs to help keep everything more comfortably positioned.
When I'm lying on my back, I can use support underneath my legs.
Again, the exact position depends on what feels comfortable for my joints at the time.
I think the biggest lesson from all these pillows is that comfort often involves supporting several areas of the body at once, rather than just focusing on wherever the pain is most obvious.


WORKING COMFORTABLY
MY THREE SOFT-OFFICE SETUPS
When you live with chronic pain, fatigue, joint instability or other conditions that make sitting at a conventional desk uncomfortable, finding a suitable working setup can be surprisingly challenging. Over the years I've developed what I like to call my 'soft office'.
Essentially, it's a way of using sofas, cushions, supportive seating and a laptop setup to make working from home more comfortable for my particular conditions. I've used three different versions depending on the furniture and space available, and they've evolved as I've moved homes and learnt more about what my body needs.
They're not conventional ergonomic desk arrangements, and they certainly won't suit everybody, but for me they've been really useful adaptations.
SETUP 1: A REGULAR SOFA
A)AGAINST A WALL
This is one of the simpler versions and something I used in an earlier home. Rather than sitting upright on a regular sofa without enough support, I pushed the sofa against a wall and used plenty of pillows to create a more supportive arrangement.
I could sit with my legs raised, fill the space around my body with cushions and use the wall behind the sofa as a firmer backing for additional support.
The idea was to avoid having to hold myself upright without adequate support, particularly around my neck, back and arms.
It's a useful example of how you can adapt furniture you already own, rather than necessarily having to buy a specialist chair.
B) WITH FOOT STOOL
This is a very basic setup great for sofabeds or very basic sofas without any arm rests and that are quite hard. Sit with your legs up with a foot stool, and then add pillows behind and around you for getting the similar effect as the other setups.
SETUP 2: AN L-SHAPED SOFA OR CHAISE
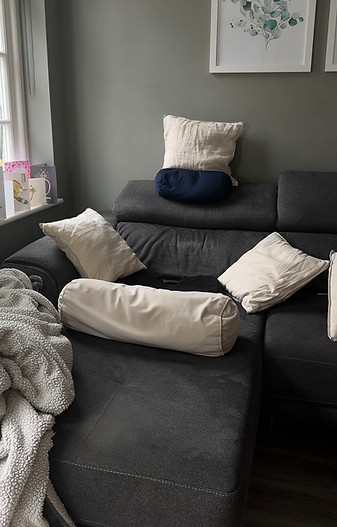
Another version I've used is an L-shaped sofa or chaise. Having the additional space to extend my legs makes it easier to find a comfortable position, but it's the pillows that really help turn it into a more supportive setup.
I use different cushions around my body to support my neck, elbows, hips, knees and sides. One issue I've found with sofas that sit in the middle of a room is that the backrest isn't always high enough to support my neck.
And when you start stacking pillows above the backrest, they have a habit of falling backwards!
One workaround I've used is placing a firm board behind the cushions to provide additional height and support. Obviously this needs to be properly secured and safe, without any risk of the board falling, shifting or creating sharp edges.
But it's a good example of adapting an existing sofa to make it more suitable for my cervical instability.
SETUP 3: AN ELECTRIC RECLINER
After trying different arrangements over the years, I've found that an electric recliner is my favourite option. Having the ability to adjust the chair's position electronically makes such a difference when you're dealing with joint instability, fatigue and difficulty changing positions.
I can adjust the backrest and leg support without having to physically push or pull the furniture into place.
And depending on the chair, certain models can also offer assistance with standing up. This became particularly useful after my C-section, when getting up and down was much more challenging.
I still use plenty of cushions around me, just like with the other setups, but having the adjustable chair underneath makes the whole arrangement so much easier to adapt throughout the day.
And because I spend a significant amount of time sitting or resting at home, finding somewhere that feels properly supportive is incredibly important to me.
MAKING THE LAPTOP SETUP MORE COMFORTABLE
One thing I've learnt from working at home is that it's not enough to only think about the chair or sofa.
You also need to consider where your laptop sits, how your arms are supported and what your neck is doing whilst you're working.
If I'm constantly looking down at a laptop or holding my arms unsupported, it can trigger additional pain and instability.
So I use pillows to support my elbows and arms, alongside a laptop tray or beaded lap cushion that gives the computer a more comfortable surface.
I try to arrange everything so my neck is supported, my shoulders aren't constantly working to hold my arms up and my body isn't being pulled into an uncomfortable position.
It can involve quite a bit of pillow arranging to get everything just right! And I'll often adjust the setup throughout the day depending on my symptoms.
One thing I would recommend is avoiding staying in any one position for too long, even if it initially feels comfortable.
For me, the benefit of the soft office is being able to support my body and change positions when I need to, rather than trying to force myself to sit at a desk for hours.




A FEW MORE THINGS I'VE LEARNT ABOUT MAKING HOME LIFE ACCESSIBLE
I think one of the biggest lessons I've learnt from adapting different homes is that accessibility is incredibly individual. What works for one person with EDS might be completely unsuitable for another person with exactly the same diagnosis, and when you have multiple chronic illnesses, things can become even more complicated because an adaptation that helps one condition might make another worse.
For example, something that reduces walking might involve more sitting, which can aggravate joint pain.
Or a piece of equipment that reduces physical effort might be difficult to tolerate because of noise, vibration or sensory sensitivities. So I think the most useful place to start is by looking at the actual movements, activities and environments that cause problems for your own body.
-
What are you constantly struggling with?
-
Which parts of daily life are taking up the most energy?
-
Are there tasks you avoid because you know they'll trigger symptoms?
-
Could something be moved, raised, automated, shared or approached differently?
Sometimes the answer might be a particular product or piece of equipment. But sometimes it's as simple as moving your plates to a higher cupboard, changing where you sit or arranging for somebody else to handle the bottom half of the dishwasher, and I think that's what I love about home adaptations.
They don't always have to be huge changes. Sometimes the smallest adjustments can make everyday life so much more manageable.
FINDING WHAT WORKS FOR YOUR BODY
I've spent years gradually changing how I live, work and manage my home around my chronic illnesses.
And moving into our bungalow this year has really brought together so many of the things I've learnt along the way.
Having level access, raised appliances, easier-to-manage flooring, an accessible home studio and the different supportive setups I rely on has made such a difference. Particularly now we're navigating life with a newborn too!
Of course, even with all these adaptations, I still experience pain, fatigue, flare-ups and plenty of limitations.
Having an accessible home doesn't make chronic illness disappear...
But it can reduce some of the unnecessary challenges involved in everyday life, and give us more opportunities to use the energy we do have on the things that matter to us.
And if sharing these adaptations gives somebody else even one useful idea for making their home a little more comfortable or accessible, then that's exactly why I wanted to put everything together in one place.
Katya x
